

PDF compression re-encodes the heavy parts of a file, usually the images, so the document carries less data while still looking the same on screen.
Before you choose a method, check one thing: is the PDF mostly text, or is it mostly images? That answer decides whether compression will help. A text-based PDF may already be close to its smallest practical file size, while a scanned or photo-heavy PDF can often shrink a lot because its image resolution and DPI can be reduced.
This guide explains how to compress a PDF online and why some PDF files become too large. You'll also learn how to reduce a PDF to a specific size, such as 200 KB, 1 MB, or 2 MB. We'll cover how to compress PDFs on Windows without Adobe and on Mac, what quality loss means, and why some files won't shrink. Finally, you'll learn whether AI can compress PDFs and when it's better to compress, zip, or split a file.
The key rule is simple: compression works best when the PDF contains images. It works less when the file is already mostly text, vector graphics, or previously compressed image data.
For very tight limits, such as 200 KB, you also need a reality check before wasting three tries. A text PDF of several pages can usually fit under 200 KB. One or two simple scanned pages may fit if the scan is grayscale and the DPI is lowered carefully. A multi-page colour scan, photo-heavy document, or detailed certificate usually cannot reach 200 KB without becoming hard to read.
So the goal is not just to make the file smaller. The goal is to make it small enough for the upload limit while keeping the document readable.
How Do You Compress a PDF Online?
Open the PDFNoob compress PDF tool, upload or drop in the PDF, choose a compression level, and download the smaller file.
➤ Open the PDFNoob compress PDF tool.
➤ Click Upload PDF to Compress and select the PDF file you want to compress.
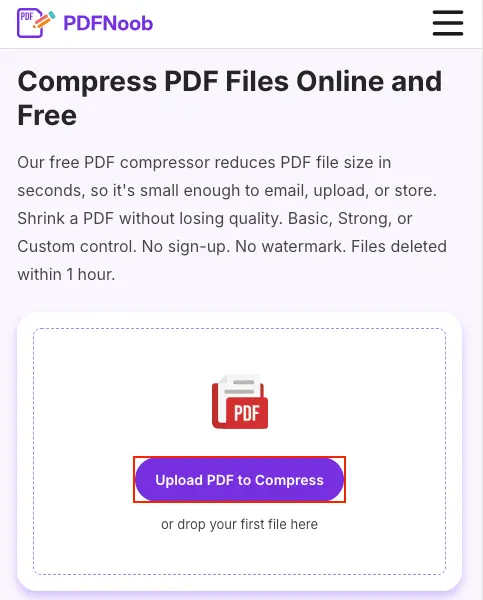
➤ Choose a compression level: Basic, Strong, or Custom.
For this example, Basic is selected.
➤ Click Compress PDF to start the compression.
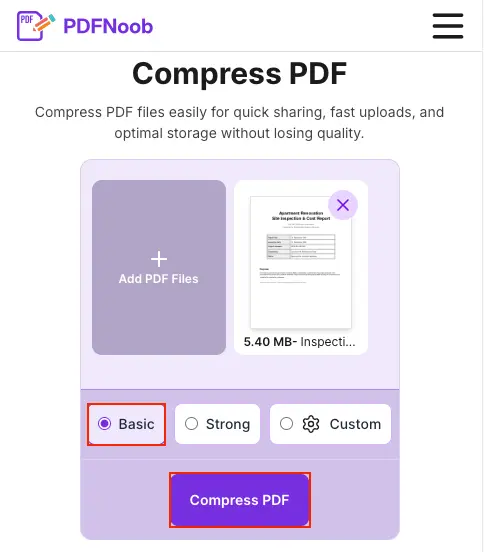
Wait until the compression is complete. Now, you can compare the Original Size with the Compressed Size.
➤ Click Download Compressed PDF to save the PDF.
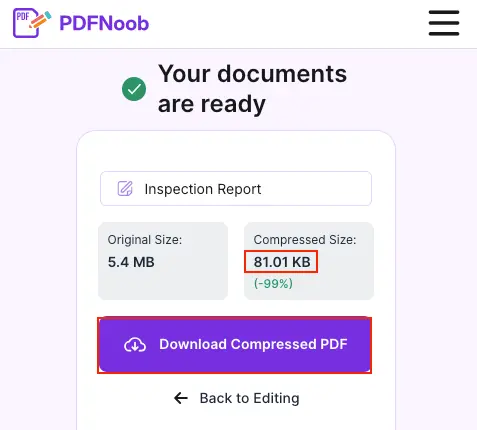
The online compressor creates a new compressed copy, so the original file on your device stays untouched. You do not need to install software or create an account before using it.
The compression level controls how strongly the tool reduces the heavy parts of the PDF. A lighter level keeps more detail and usually saves less space. A stronger level reduces the file more, but it may lower image quality, especially on scanned pages, photographs, or documents with small print.
A scanned PDF or photo-heavy PDF usually has the most room to shrink because the file is carrying images of pages. It may drop by more than half after compression. A text-and-vector PDF may barely move at all because there is not much image data left to reduce.
If the smaller file only saves a tiny amount, the compressor is not automatically broken. The file may already be near its smallest practical size. Thus, compression is the wrong lever, and you may need to remove pages, convert scans to grayscale, split the file, or use another method instead.
What Makes Your PDF Too Large?
Images make most large PDFs heavy, especially a scanned page, because each page is really a photograph of paper rather than text.
That is why the first test is simple: try selecting a word. If you can select and copy real text, the file is mostly text or vector text. If you cannot select the words, the PDF is probably made from scanned images, and the image resolution is doing most of the damage.
Other parts can add weight too, but they usually matter less than images. An embedded font can increase size, duplicated objects can repeat the same data across pages, metadata can carry extra document information, and attachments can make the PDF larger without changing how the pages look.
So the real question is not just “how do I compress this PDF?” It is “is this PDF mostly text or mostly images?” A mostly image-based PDF needs image compression, grayscale, lower DPI, or page removal. A mostly text-and-vector PDF may already be near its floor.
If a compressor saves only 2%, that does not always mean the tool failed. It often means the file has very little left to remove without changing the document itself.
| Size contributor | Typical share of file size | What to do about it |
|---|---|---|
| Scanned pages and photos | Usually the largest part of the file | Compress images, reduce DPI, convert to grayscale, or rescan at a lower resolution |
| Embedded fonts | Sometimes noticeable, especially in designed documents | Keep only the fonts needed for the final file, or export again with smaller font embedding settings if available |
| Duplicated objects | Can matter when the same image, logo, or background is repeated badly | Export from the source again or use a compressor that removes duplicate objects |
| Metadata | Usually small, but easy to remove | Remove unnecessary author data, app data, thumbnails, and document history |
| Attachments | Can be large if extra files are packed inside the PDF | Remove embedded files or send them separately |
How Do You Compress a PDF to a Target Size Like 200 KB or 1 MB?
Pick the tool preset for the target size you need, then check the final file against the upload limit before you send it anywhere.
The common limits are tight for a reason. Government forms and exam portals often ask for 100 KB or 200 KB because they process thousands of uploads. Email attachments, job applications, and general upload forms more often allow 1 MB or 2 MB, which gives the PDF more room to stay readable.
If the preset overshoots, do not keep pressing the same button and hoping the file develops manners. Simply use a stricter order.
➤ Compress the PDF first.
➤ Remove pages you do not need.
➤ Convert colour scans to grayscale.
➤ Re-scan at a lower DPI only as the last resort.
A 200 KB limit is realistic for a one-page text PDF, a simple form, or one clean scanned page. It is sometimes possible for two simple scanned pages if the scan is grayscale and not full of tiny print. It is usually not realistic for a multi-page colour scan, a photo-heavy document, or a detailed certificate without hurting readability.
For a 1 MB ceiling, text documents are usually comfortable. Scanned documents can fit too, but the page count matters. Once a scan reaches five to eight pages, especially in colour, it may stop fitting under 1 MB at readable quality unless you remove pages, switch to grayscale, or lower the scan resolution.
| Target | Typical use | Realistic page count | Method |
|---|---|---|---|
| 100 KB | Small government forms, exam portals, profile uploads | Several text pages, or 1 very light grayscale scan | Use strong compression, grayscale, and remove anything unnecessary |
| 200 KB | Government uploads, exam forms, certificate uploads | 1 text PDF, 1 clean scan, sometimes 2 simple grayscale scans | Compress first, then grayscale, then remove extra pages |
| 1 MB | Email, job applications, document portals | Many text pages, or about 5 to 8 grayscale scanned pages (3 to 5 in colour) | Use medium compression first, then grayscale if needed |
| 2 MB | Email, application portals, general file uploads | Most text PDFs, or about 5–10 scanned pages depending on colour and detail | Use lighter compression if readability matters |
| Above 2 MB | Portfolios, reports, image-heavy documents | Depends heavily on images and page count | Compress images, remove duplicate pages, or split the file |
How Do You Compress a PDF on Windows Without Adobe?
Open the PDF in Microsoft Word, then save it back to PDF with the minimum size option selected.
➤ Open the PDF in Microsoft Word. Word shows a message that it will convert the PDF into an editable document.
➤ Click OK, then click the File tab.
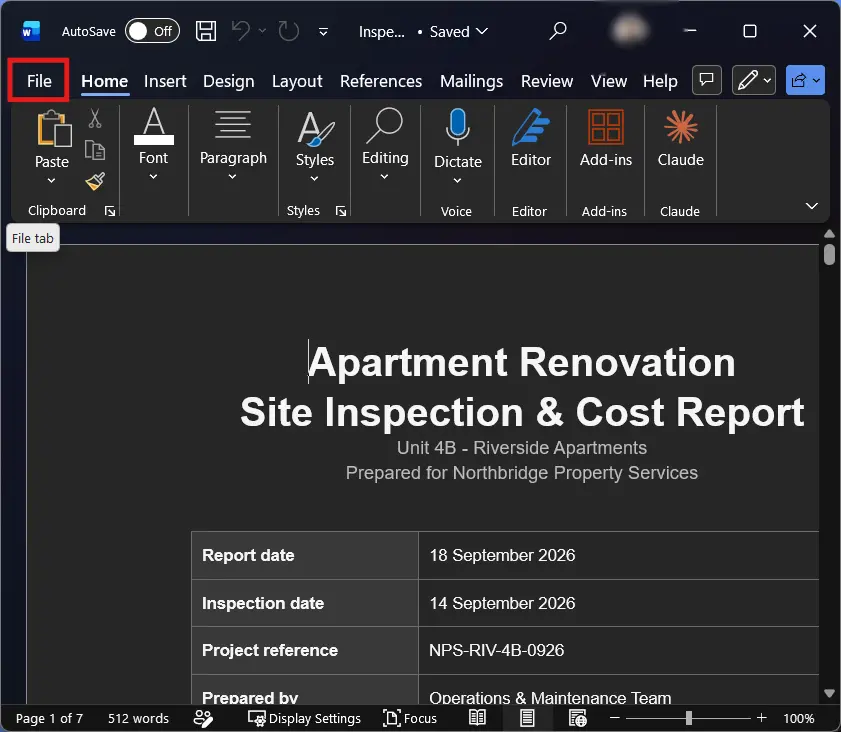
➤ Go to Save as > More options.
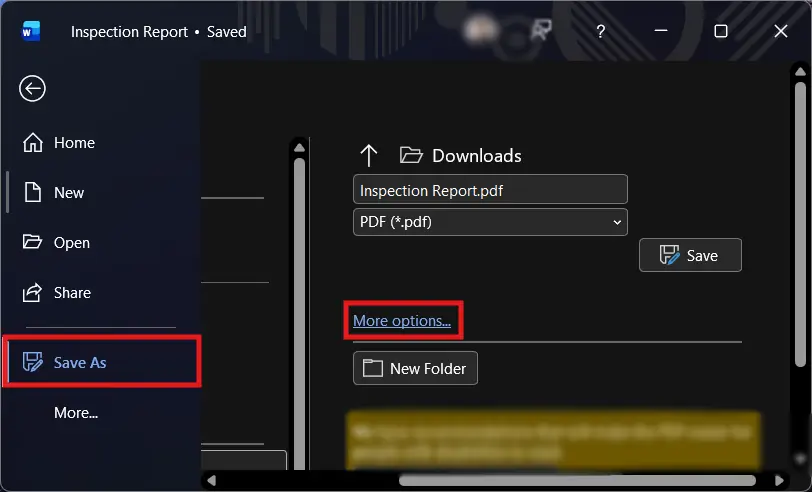
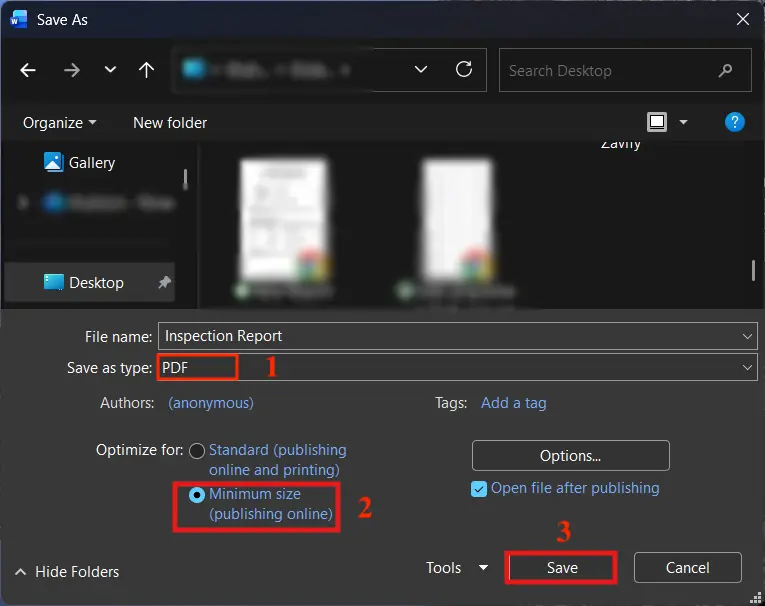
➤ From the Save as type, choose PDF.
➤ In the Optimize for section, select the Minimum size (publishing online) option.
➤ Click Save.
Thus, it creates a smaller PDF for screen viewing and online sharing.
This route works best for simple text documents. It can change the layout on a scanned PDF, a form, a file with complex tables, or a heavily formatted report because Word is not compressing the original PDF directly. It is recreating the document and exporting a new PDF from that version.
Windows also has a Print to PDF route. Open the file, choose Print, select Microsoft Print to PDF as the printer, and save the output. Use this carefully because printing to PDF can silently discard clickable links, bookmarks, form fields, comments, and other interactive parts of the file.
After saving, open the new PDF before you send it. Check the page order, spacing, images, links, forms, and any important formatting. If the layout shifted or interactive parts disappeared, use an online compressor or a dedicated PDF editor instead of the Word or Print to PDF route.
How Do You Compress a PDF on a Mac?
Open the file in Preview, choose File > Export, apply the Reduce File Size Quartz filter, and save the compressed PDF.
Keep the original file before you start. Preview does not show the final file size before saving, so you have to export first, check the result, and compare it with the original.
The default macOS Reduce File Size filter is aggressive. It can shrink scanned documents quickly, but it can also make photographs, signatures, stamps, charts, or small text look rough. The problem is not that Preview is broken. The problem is that the filter uses broad downsampling instead of giving you careful control over each page.
This becomes more obvious in mixed documents. A PDF with text scans on some pages and photographs on others may come out unevenly degraded because the default filter pushes every image toward the same target. One page may still look fine, while the photo page suddenly looks soft or blocky.
If the Preview result is too blurry or too harsh, use an online compressor instead. A compressor with adjustable levels lets you choose a lighter setting, compare the output, and keep readability instead of accepting one fixed macOS filter result.
Does Compressing a PDF Reduce Its Quality?
Yes, compressing a PDF can reduce quality, but mostly in the images. Real text usually stays sharp, while image quality drops when scans, photos, signatures, charts, or page pictures are reduced.
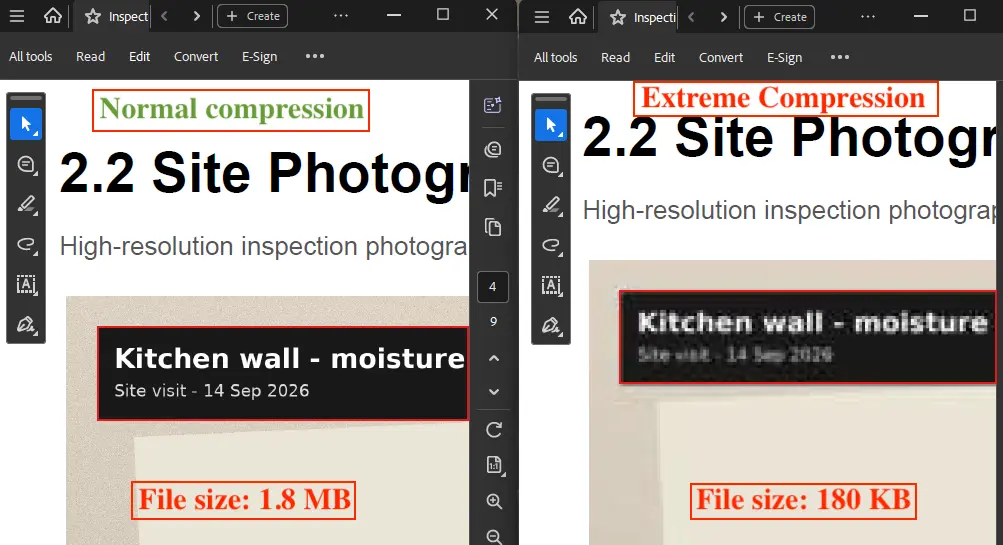
A text-based PDF and a scanned PDF behave differently. If the page uses real text, the letters are stored as text or vector shapes, so they usually remain crisp after compression. If the page is a scan, the words are part of an image, so lowering the image data can make small print softer and hurt legibility.
Lossless compression makes the file smaller without throwing away visible detail. It is safest for text, simple graphics, and files that only need small cleanup.
Lossy compression removes image detail to reduce the file further. It is useful for scanned pages and photo-heavy PDFs, but the stronger the setting, the more visible the trade-off becomes.
“Extreme” or “hyper” compression usually means the tool drops images to a much lower DPI. Around 72 to 100 DPI, a PDF may look acceptable on a screen if the pages are simple. But small print, stamps, signatures, and faint scans can start to break. For readable screen use, scanned text is usually safer at around 150 DPI. For printing, 200 to 300 DPI is a better target.
Before sending the file, open the compressed PDF at 100% zoom and check the smallest text on the busiest page. If that text is readable, the compression is probably acceptable. If it looks fuzzy, broken, or hard to read, use a lighter compression level.
Why Is Your PDF Not Reducing in Size?
Your PDF may not reduce in size because there is little left to compress, the file has password protection or permissions limits, or the compressor has already run once.
If the file is mostly text, simple vector content, or already-compressed images, a second compression pass may only save a tiny amount. That does not mean the tool failed. It means the file is already small for what it contains.
A protected PDF can also block the tool from changing the file. If the PDF needs a password before it opens, or if its permissions block editing or saving changes, unlock or clear those limits first before trying to compress it again.
Sometimes the PDF contains an already compressed image stream. That means the images inside the file have already been reduced. So the compressor has very little image data left to remove. Re-running the same tool will not magically invent space.
A PDF that is one giant scan has the opposite problem. It may be huge because every page is a full-page image. But if the scan is already low quality, stronger compression may only make it blurry without saving enough space.
When normal compression stops helping, use manual levers. Remove pages you do not need, crop wide margins, convert colour scans to grayscale, or re-scan at a lower resolution. If the file genuinely cannot shrink enough, send it as a link or split it into smaller files. Our guide on how to split a PDF shows how to do it by page range.
| What you see | Why it happens | What to do |
|---|---|---|
| The file only gets 1–3% smaller | It is mostly text, vector content, or already near its size floor | Stop re-running the compressor; remove pages or split the file if the limit is strict |
| The tool asks for a password or refuses the file | Password protection blocks access or changes | Unlock the file first, then compress the unlocked copy |
| The file opens but will not save compressed output | Permissions may block editing or rewriting | Clear the permissions, then try compression again |
| Photos still make the file large | The images may already be in a compressed image stream | Lower image quality further only if readability still holds |
| A scanned PDF becomes blurry but not much smaller | The scan is already low quality or full-page image data is still heavy | Convert to grayscale, crop margins, remove pages, or rescan at lower resolution |
| The file is still above the upload limit | The target may be unrealistic for the page count and content | Send a link, split the PDF, or reduce the document before exporting again |
Can AI Compress a PDF for You?
A chat assistant cannot compress a PDF by itself because it cannot re-encode the file; it can only help you understand what is making the file heavy.
AI can still be useful before compression. It can help identify whether the PDF is mostly scanned pages, photos, long text, repeated images, or unnecessary content. It can also create a document summary or help extract key information if you decide the file should become shorter instead of smaller.
The actual size reduction still needs a PDF compressor or file conversion tool. That is the part that changes the bytes inside the file, especially the image stream where scanned pages and photos are stored.
If you upload a PDF to a chat tool and ask it to shrink the file, it may explain what to do, suggest settings, or summarize the content. But unless the tool has a real file-processing feature attached, it will not return a genuinely compressed PDF. The file size will not change just because the chat response says it should.
Use AI for diagnosis and planning. Use a compressor when the file itself needs to become smaller.
Should You Compress a PDF, Zip It, or Split It?
Choose based on one question: which method gets the file past the upload limit, and what do you give up to get there?
Compression is usually the first choice. It re-encodes the content, especially the image stream, so the file stays as one PDF that anyone can open. The cost is possible image-quality loss, especially on scanned pages and photo-heavy files.
A ZIP archive wraps the PDF inside another file without really changing the PDF itself. That is useful for bundling several files together or adding archive-level password protection, but it usually does not solve a strict upload limit. A PDF is already compressed internally, so zipping one PDF often saves only a small, single-digit percentage.
Splitting the PDF keeps the quality of every page because it does not reduce image detail. Instead, it divides the document into smaller files by page range. The cost is that you now have more than one file to send or upload.
Use compression when the portal needs one smaller PDF. Use ZIP when you need to bundle multiple files or protect an archive. Use splitting when the file cannot shrink enough without damaging readability. For the archive side, see our guide on how to convert a PDF to ZIP. For splitting by page range, see how to split a PDF.
| Method | What it costs | When to use it |
|---|---|---|
| Compress the PDF | May reduce image quality, especially in scans and photos | Use it when you need one smaller PDF for an upload limit |
| Zip the PDF | Usually saves very little space on a single PDF | Use it to bundle several files together or add archive-level protection |
| Split the PDF | Creates more than one file | Use it when quality cannot be touched, but the file is too large |
How Do You Compress a PDF File to Less Than 1 MB?
Use the 1 MB preset, then check the final file size before you upload or send it.
A 1 MB limit is usually comfortable for text documents, forms, resumes, certificates, and simple reports. It becomes tighter when the file is a scanned document, because every page is stored as an image instead of real text.
If the compressed file lands just above 1 MB, try one step at a time. Use a stronger compression level, remove pages you do not need, convert colour scans to grayscale, or lower the scan resolution slightly. Do not jump straight to the harshest setting if the document has small text, stamps, signatures, or tables.
A scanned document usually starts becoming hard to keep under 1 MB at readable quality once it reaches about 5 to 8 grayscale pages, or 3 to 5 pages in colour. Simple grayscale scans may still fit. Colour scans, photo-heavy pages, and pages with tiny text may cross the limit much sooner.
For a direct size-specific option, use Compress PDF to 1MB and complete the same verification step after downloading the result. The label tells you the goal, but the final file size is what matters.
How Do You Compress a Scanned PDF Without Losing Readability?
A scan is a set of page photographs, so compress it as images and keep the text readable by protecting the DPI, not by chasing the smallest possible file size.
Start with a medium compression level, then check the smallest text at normal viewing size. If the words still look clean, you can try a stronger setting. If the letters look soft, broken, or muddy, the scan has gone too far.
For many scanned documents, grayscale gives the biggest safe saving. It removes colour data from pages that only need black text, stamps, or simple marks. That can reduce file size without damaging readability as much as harsh image compression.
The practical floor is about 150 DPI for readable scanned text. Below that, small print, faint ink, tables, and official stamps can stop being reliably readable. A simple page with large text may survive lower settings, but forms, certificates, and ID documents usually need more care.
Adding a text layer can make a scanned page searchable, but it usually does not make the file smaller. For that separate workflow, use OCR PDF. This section is about keeping the scanned image readable while reducing its size.
How Do You Manually Reduce PDF Size by Removing Pages?
Delete the pages you do not need, and the PDF size falls with them without lowering the quality of the pages you keep.
This can beat compression when the file contains a cover sheet, repeated pages, a blank page, scan backs, or a duplicated appendix. Compression tries to reduce the data inside each page. Page removal gets rid of the whole page, so there is no quality trade-off on the pages that remain.
This matters most in scanned documents. A blank scanned back side may look empty, but it is still saved as a full-page photograph. Removing four blank scan backs can save more space than another compression pass because each blank scan still adds image data to the total page count.
After deleting pages, check the document again before uploading it. Page numbers, table of contents entries, references, and form instructions may shift after pages are removed. For the full deletion workflow, use Remove PDF pages.
Use page removal when the extra pages are not required. Use compression when every page must stay in the file.